Paper Cutter Support
Click Here To Download Paper Cutter Manual
Contact Us
If the below info doesn’t help, you may contact us at the following email:
info@hfsusa.com
This page will help with the most common issues we're asked about with our paper cutters. Some of these issues may be the result of shipping damage (if a cutter is dropped at a weird angle some parts can shift), or just the wear and tear of extended use. If the below guides don't help, please feel free to reach out to us by clicking the blue contact button at the bottom of your screen.
Note: Our cutters comes with a 1-Year Limited Warranty, however the blade and red cutting stick are specifically not covered. This is due to the blade and knob being sacrificial parts, they will wear out with use and need to be replaced, such as tires on a vehicle.
Safety Guidelines
Operator should read the entire manual before attempting to use the cutter.
Never place hands below the blade, always use the included blade holder when changing the blade.
Do not attempt to cut any material other than paper.
Keep away from children. Store cutter with blade down, clamp down, and handle removed.
Initial Assembly
- Remove the cutter from box and place on a flat surface.
- You may need to reverse the shakeable handle
using the included allen wrench. See photo to the right. - Attach the paper cutting handle by sliding it over the rod. The handle doesn’t attach in any way keeping it easy to remove.
- Rotate the shakeable handle clockwise to tighten the paper. It needs to be clamped very tightly to keep the paper from shifting while being cut.
- Push the security lock while lowering the paper cutting handle.
- Firmly press the paper cutting handle all the way down until the blade strikes the red blade pad.
- Raise the blade and pressure plate to remove your cut paper.
Operation
- Rotate the shakeable handle counter clockwise to lift the pressure plate.
- Lift the blade handle to raise the blade to max height, the rear security lock should engage.
- Move the stop ruler to your desired cutting length, and insert paper square against side and stop ruler.
- Rotate the shakeable handle clockwise to tighten the paper. It needs to be clamped very tightly to keep the paper from shifting while being cut.
- Push the security lock while lowering the paper cutting handle
- Firmly press the paper cutting handle all the way down until the blade strikes the red blade pad.
- Raise the blade and pressure plate to remove your cut paper.
Troubleshooting
• Maintenance
All moving parts with screws should be checked periodically to be sure the screws are tight. They may become loose in the process of transportation. Users should also check and tighten the screws after more than 200 cutting cycles. All moving parts should be lubricated periodically to maintain performance and equipment life.
• Replacing The Feet
The cutter has 4 molded plastic feet, one at each corner.These feet keep the cutter from slipping and keep it level.These feet can be broken during shipping, or if the cutter is dropped. We have included one extra foot just in case of shipping damage, but we are happy to send more.Please contact us within 5 business days of receiving your cutter to let us know you need replacement feet. If feet are later damaged by accident we do have them available for purchase as well.The feet can be inserted directly into the corner of the paper cutter base, simple pull the broken foot off and attach the new one in its place.
• Replace Cutting Stick
The cutting stick is the red surface that the blade contacts during the cutting process. Eventually the blade will cause a deep groove in the cutting stick which will cause issues with cutting the last few sheets of paper, what that happens it needs to be rotated or replaced. Each side of the stick can be used twice by flipping the stick length-wise, then you can rotate to a fresh side of the stick for 8 usable areas total.
1. Turn the cutter upside down
2. Locate two screws that go horizontally into the cutting stick
3. Loosen the screws, then push the stick out through the top of the cutter
4. Replace the stick with a fresh side under the blade
5. Tighten the screws back in (not too hard, you don't want to make indentations in the stick
• Handwheel Won't Tighten
If you are having trouble with the handwheel not tightening the issue is most likely that the bolt attached to the handwheel as stripped. This can be caused by accidentally over-tightening the handwheel. This knob only needs to be barely tight to hold the guide in place the guide serves no purpose in holding the paper in place while cutting, which is done by the pressure plate.
1. Look at the end of the channel where the handwheel slides, notice the black plastic cap.
2. Remove the cap. It will be screwed in from the bottom of the cutter, so be sure to remove the screw first.
3. Slide the handwheel to the end of the channel where you now have access and unscrew the knob all the way, which will allow the square nut to fall off the bolt.
4. Lift the handwheel out of the channel and either replace the handwheel, or add some washers so that the handwheel bolt and square nut engage in a different location that isn't stripped.
5. Hold the square nut to the top of the channel with your finger and screw the handwheel back into it.
6. Reattach the channel covering
• Blade Leveling Instructions
When the blade is fully down it should be slightly lower in the "back" of the cutter (near the hinge). If it isn't, there is a way to adjust it. First try turning the blade pad to a fresh side. It can be rotated 8 ways before it needs to be replaced. On the bottom (underneath) of the cutter there are 2 bolts that go horizontally into the side of the blade pad. Loosen those and push the blade pad out through the top of the cutter. Turn to a fresh side and put it back into place.
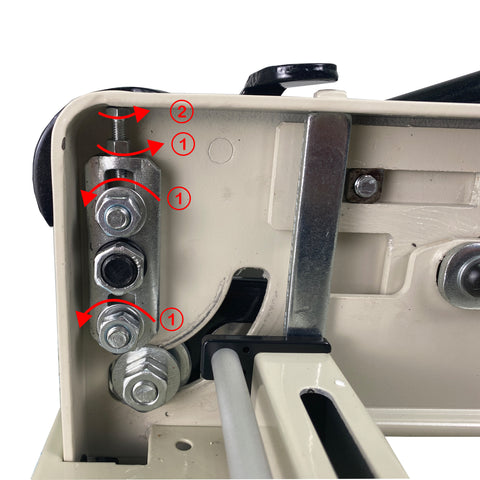
However, sometimes even if the cutting stick is replaced, the paper still cannot be cut off. Here are some solutions to the problems:
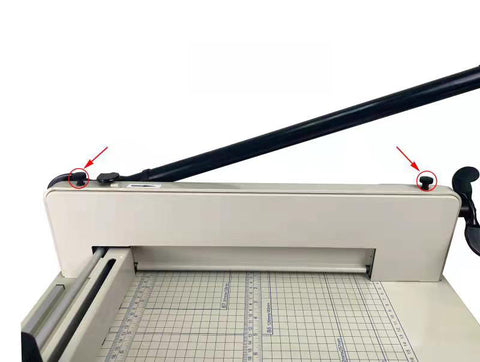
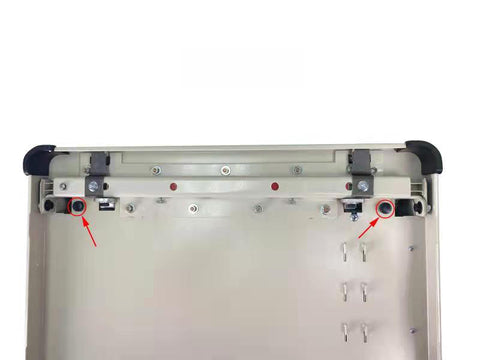
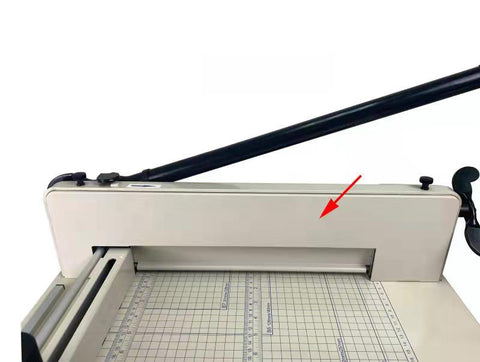
Picture 1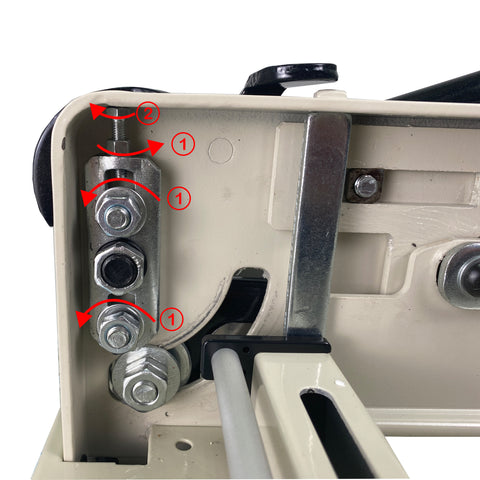
Picture 2 Picture 3
Problem: The front part of the paper(near the shakable handle)cannot be cut off.
Solution
1.Dismantle Paper Cutter Hood
Remove the hood screws on the top of the knife as shown in Picture 1 and the two on the bottom of chassis as shown in picture 1
2.Loosen the nuts ① in 360-degree anticlockwise position and in clockwise position as shown in picture 2
3.Put a piece of paper beneath the blade for trail cutting. When the paper cutter handle pressed down, the adjustment block will automatically lift up until the blade can cut off the paper.
4.Tighten the nuts ①in clockwise position
5.Make sure the blade should contact the back of the cutting stick first, and still be 1/16-1/8" away from the touching in the front.
Problem: The rear part of the paper(near the blade leg) cannot be cut off.
Solution
1.Dismantle Paper Cutter Hood
Remove the hood screws on the top of the knife as shown in Picture 1 and the two on the bottom of chassis as shown in picture 1.
2.Loosen the nuts ① in 360-degree counter clockwise position and ② in 360-degree counter clockwise position and ② in clockwise position as shown in picture 3
3.Put a piece of paper beneath the blade for trail cutting until the blade can cut off the paper.
4.Tighten the nuts ① in clockwise position
5.Make sure the blade should contact the back of the cutting stick first, and still be 1/6-1/8" away from the touching in the front.
• Replacing The Blade
The cutting blade is made of heat-treated high-carbon steel and is designed for repeated use. However, over time the blade will become dull, and not perform to the highest standards. Cutting heavy paper or cardboard will dull the blade more quickly than thinner paper stock. A dull blade will not cut accurately. To remove the blade, place the blade holder under the blade and lower the blade until it rests on the holder. Remove the screw holding the blade in place, then raise the blade mechanism which will leave the blade sitting in the holder. The blade can be sharpened by a professional sharpening service for knives, lawn mowers, swords, and more. The blade can also be replaced with a new blade.
• General How-To Operate Video
The first video below shows the basic operation of the paper cutter. Please note this was filmed on an older model and some design changes have been made since then.
• Seized Clamp Repair
The video below shows what to do in the event that your clamp becomes seized, which won't allow it to move up or down. It is a simple repair and only takes a couple minutes to complete.
• Level Clamp Repair
The video below shows how to adjust the clamp so that it is level. It also covers removing the blade for sharpening and replacing. NOTE: The blade splint has been changed and is now the lid portion of the tool box. See photos below.
• Uneven Paper Cuts
In the event that a cutter was mistakenly dropped, or by some other means knocked out of true, there is a way to realign the blade. The video below shows how this is done, by adding washers to either side of the blade to end up with a straight cut.
Note: If you just received your cutter and it is not true please contact us. We consider this a valid warranty claim if submitted within two weeks of receiving the cutter, as the tweak may have been a result of shipping damage. Claims received after that period may not be honored at HFS' sole discretion, as the tweak may have been the result of accidental end-user damage.
• Design Changes
DESIGN UPDATE /1/2016: Toolbox & Blade Holder
There has been a design change with our cutters. The movable file now has a built-in tool box which holds the extra allen wrench for the cutter. The lid for the toolbox now acts as the blade holder. See photos below:

Support / Warranty / Shipping Damage / Replacement Parts
If your cutter arrived damaged, or you have a warranty claim, HFS will take care of all issues. We also have videos available and updated information on design changes and commons questions about the cutter.
The limited-warranty period on our cutters is 1-Year from Date of Purchase. The warranty does not cover blades, feet, knobs, cutting sticks, safety pins, or customer negligence. Shipping damage claims must be submitted within one week of received the product. Returns are accepted within 30 days of date of purchase, no exceptions.
![Hardware Factory Store Inc - Molecular Sieve Zeolite 3A 8X12m - [variant_title]](http://www.hfsusa.com/cdn/shop/products/ZELOITE-3A-0812-1_{width}x.jpg?v=1752558790)
![Hardware Factory Store Inc - Molecular Sieve Zeolite 3A 8X12m - [variant_title]](http://www.hfsusa.com/cdn/shop/products/ZELOITE-3A-0812-2_{width}x.jpg?v=1752558790)


